Quantcast
Channel: Sheepo's Garage
Viewing all 73 articles
Browse latest View live

Lego Fan Weekend 2012 in Skærbæk

$
0
0
At the end of the next month I will go to my first international event: The Lego Fan Weekend event in Skærbæk at September 29th and 30th


I will go there with some of my MOCs as:

- Bugatti Veyron 16.4
- Mini Cooper Mark I
- Land-Rover Defender 110
- Truck Trial 4x4, not presented in this website yet, but it appears in the Hispalug Technic Weekend video.

Also I will show there a complety new MOC.

It has around 5000 parts(it is not finished yet, but this is the biggest MOC I've ever built...) and a lot of functions: with new gearbox, new brakes system, new suspension system and much more!!!:

I will see you there!!!


PROGRAM

Saturday 29. september

11.00: Exhibition opens
11.00: Childrens Building Competition 0-11 year starts
13.00: lotterydraw on entré tickets*
13.10: Adults Building Competition
15.45: Childrens Building Competition ends
16.00: Lottery Draw on entré tickets*
16.15: Childrens Building Competition - Prizes
17.00: Exhibition closes

Sunday 30. september

10.00: Exhibition opens
10.00: Childrens Building Competition 0-11 year starts
12.00: Lottery Draw on entré tickets*
12.10: Adult Building Competition
14.45: Childrens Building Competition ends
15.00: Lottery Draw on entré tickets*
15.15: Childrens Building Competitions - Prizes
16.00: Exhibition closes


Peterbilt 379 & CAT C15

$
0
0

Since I was a child I has been a fan of big trucks, and specially of American style trucks(in Spain is strange to see trucks with long noise).

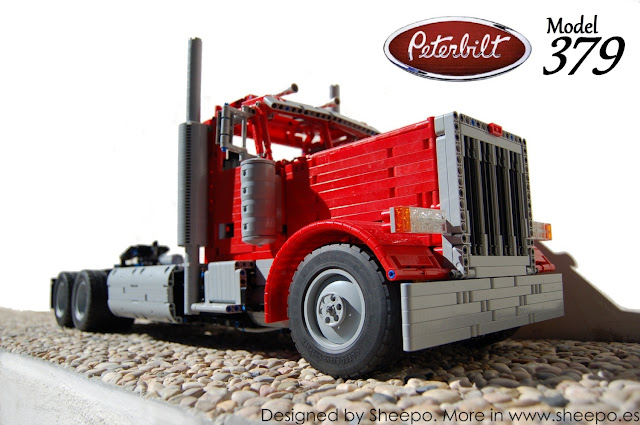
For this MOC I have chosen one of the most charismatic and representative models of these trucks: a Peterbilt 379.


Also I have endeavored to put a version of CAT C15 engine (I'm also a fan of the brand CAT).


This MOC is made in a 1/10.2 scale, giving a final size of 31 studs width, 99 length and 40 high.

Here you can see some pictures taken in Skaerbaek where you can appreciate the size, there are: this Pete, the Crow's Vampire GT(scale 1:10 too...), the Nathaniel's Supercar and my Veyron.


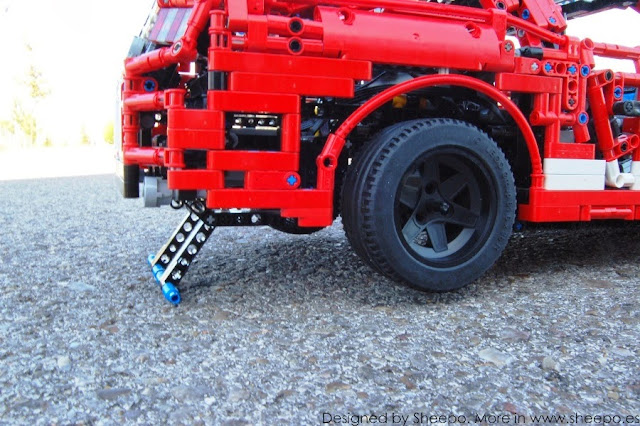
The total weight is 5.5kg, and has been one of the main problems I've had. Front axles deforms and look like the wheels has huge camber angle. This is a esthetic defect which I hate, but it has not solution if I want to keep all functions and therefore the weight of the truck. I will try to fix it comming soon.

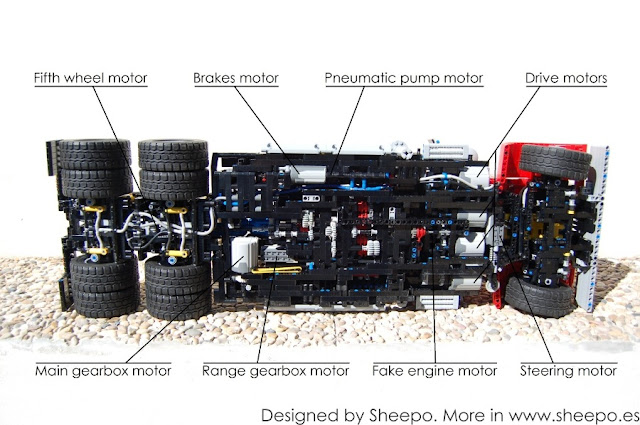
The electric system is huge, and it has:

- 2 AA PF battery boxes
- 4 PF IR recievers
- 5 PF XL motors
- 5 PF M motors
- 1 PF switch
- 3 PF large extension wires (50cm)

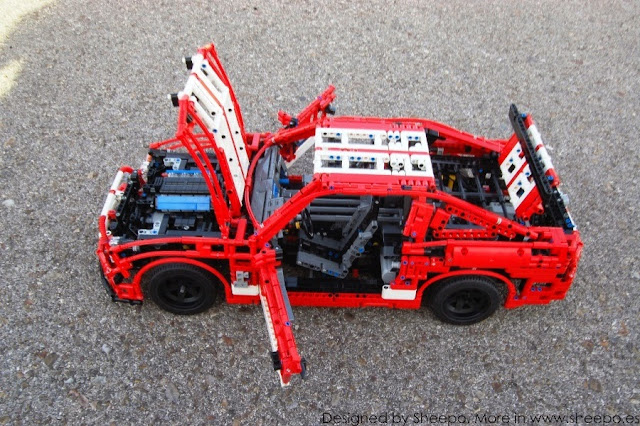
Probably, the most “wanted” picture for Lego Technic followers:
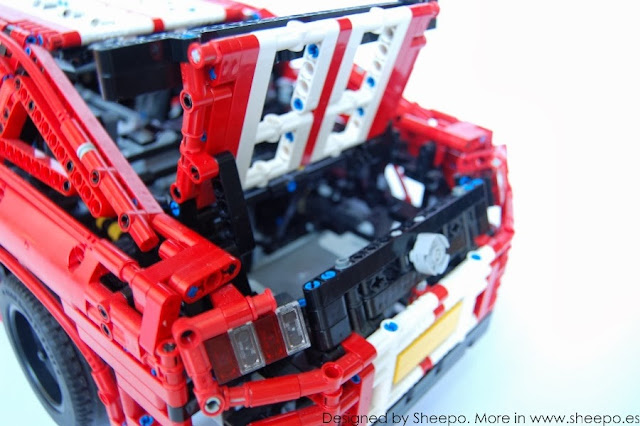

Bodywork

When did the truck I always wanted to do it complete, including the sleeper, but later I had to discard it because the cost would have been huge.


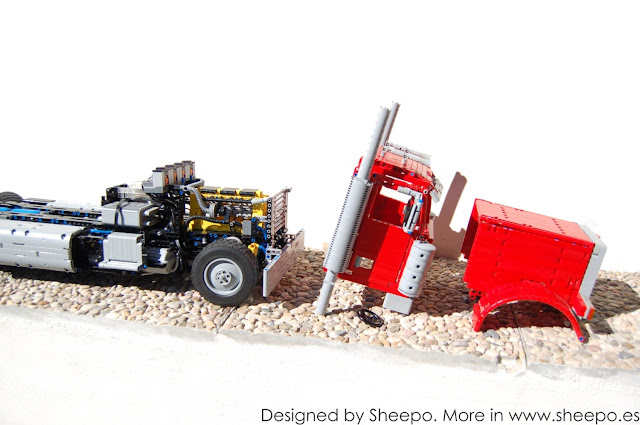
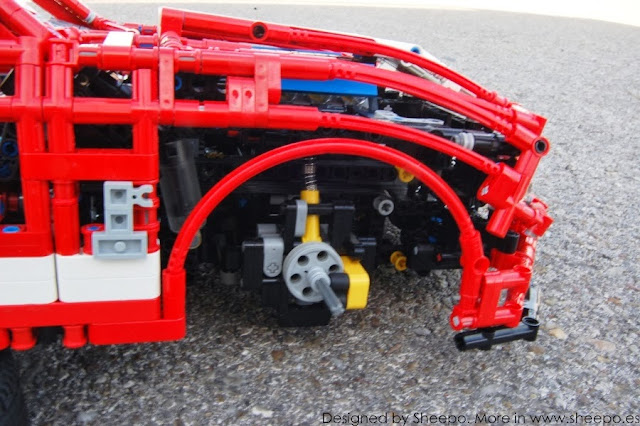
The hood can be raised, and remove if you want removing only 2 axles.
 

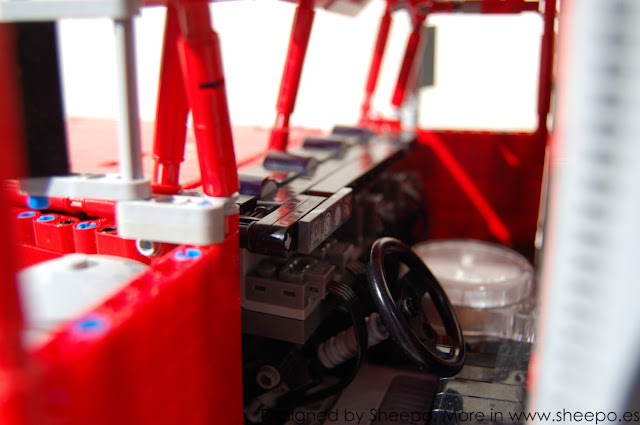
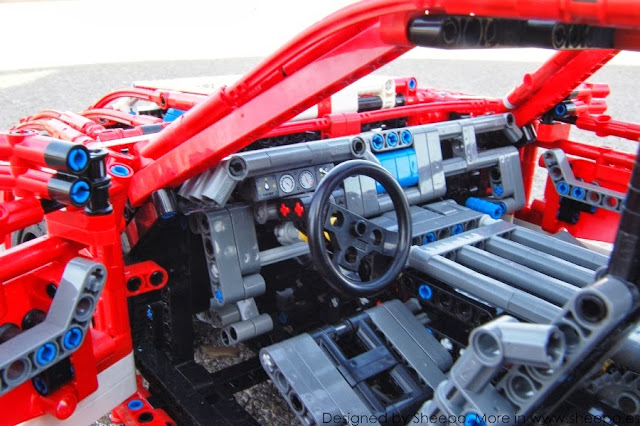
Also if the hood is open, you can remove the steering wheel and before remove the cabin in one piece just pulling up on it. Under the cabin you can find both AA battery boxes and the 4 IR receivers.


The two huge fuel tanks are used to cover part of the mechanisms of the truck: on the left the mechanism of the gearbox and on the right part of the pneumatic system.


As curious data, only the bodywork weight is more than 1 kg...
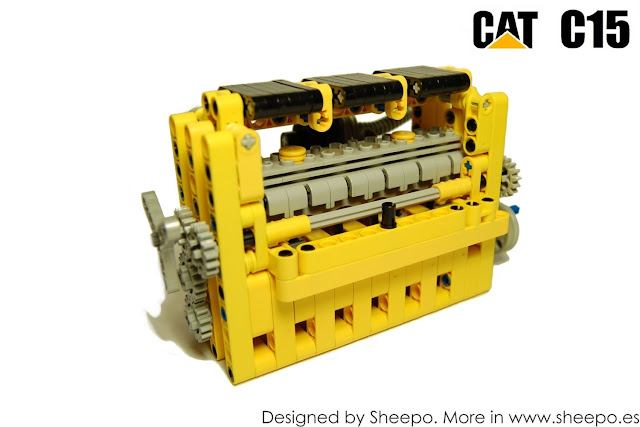
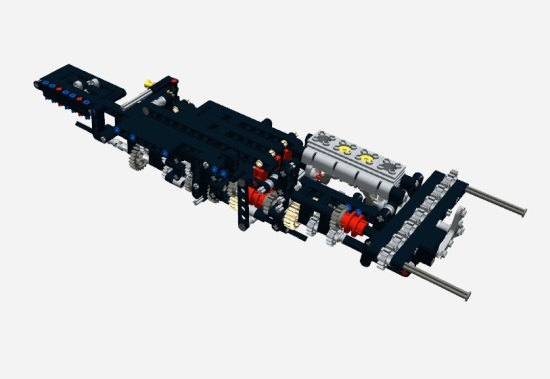
CAT C15 Engine

Under the hood you can find a replica of the CAT C15 engine, with its 6-cylinder in line.


The engine doesn't have the sides covered to appreciate that the cylinders are located in the same order as the real engine, with 120 ° intervals between them. Getting those 120 º between cylinders was very complicated but I thought it was necessary to be more faithful to the original.


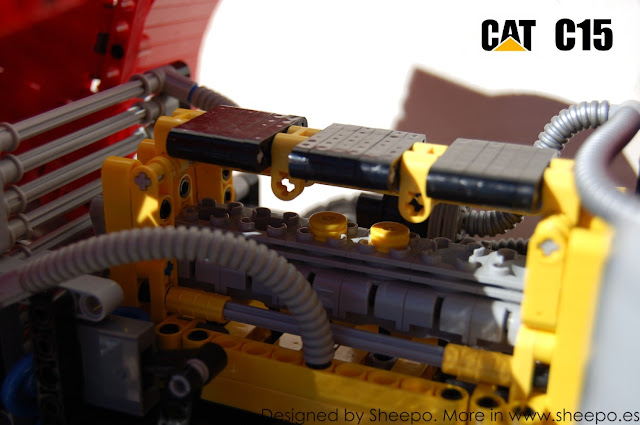
The engine also has a motor M to rotate it, which is connected directly to a battery. Between the engine and the M motor there are a differential, which is also connected to the drive motors, so that the engine is always at idling, but when you starts the drive motors the C15 accelerate adding both speeds. The rotation speeds grow up from 250 rpm up to 700 rpm aprox.
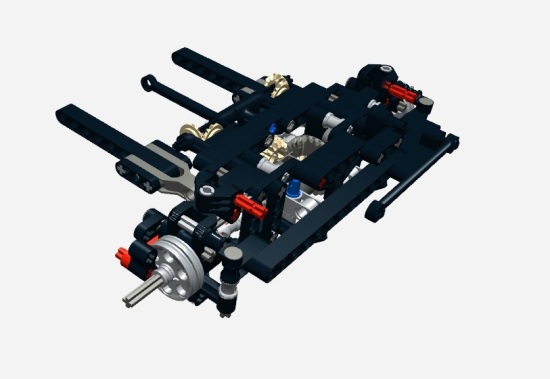
Pneumatic system

After almost 10 years without using pneumatics in any of my MOCs, I decided this was the perfect model to use it.


The pneumatic system the truck runs along the complete truck, mainly controlling the suspension and brakes on all axles.

The pneumatic system is composed mainly:

- 2 Small pumps (6L)
- 1 Large pump (for emergencies).
- 2 Air tanks
- 7 Small cylinders
- 8 Large cylinders
- 7 Valves
- 1 Manometer (LEGO part n.64065)
- 22 T connectors
- And about 5 meters of pneumatic tube in 3 colors: blue, black and light gray.

The pneumatic tube color code is this:
- Blue: general system and suspension
- White: Brakes on
- Black: Brakes off


All pneumatic control is located on the right side of the truck inside the fuel tank.


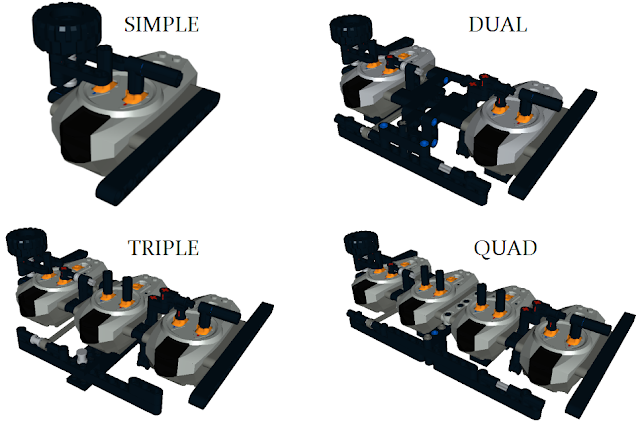
The pneumatic system starts in the air pumps. A M motor is responsible for operating them asynchronously.
The compressor has auto-stop system, it stops approximately at 2 bars pressure, and restart in 1 bar. This compressor control uses a small cylinder, a PF switch and a small spring to counteract the cylinder. To have enough air to the suspension and brakes the truck has two air tanks, they are located inside the chassis and just above the gearbox.

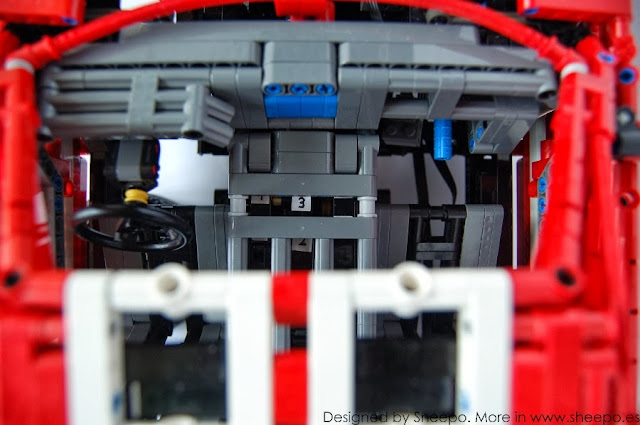
Also in the cab, between the seats, there is a manometer to measure the system pressure, it is very useful to know how much air have you at any moment.
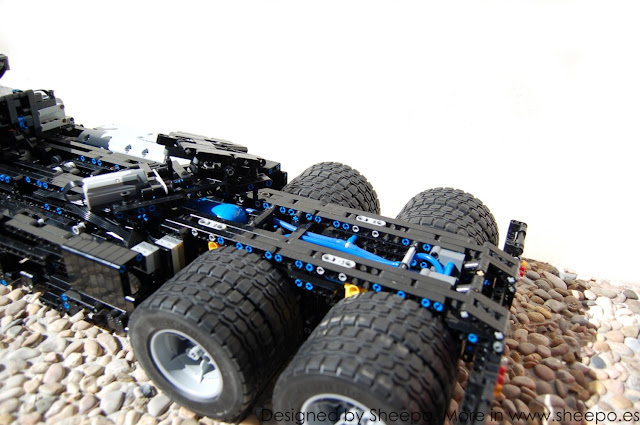
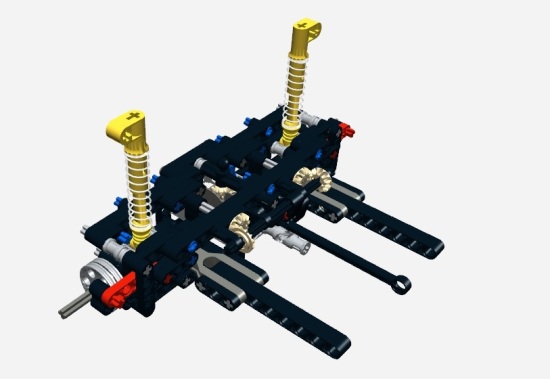
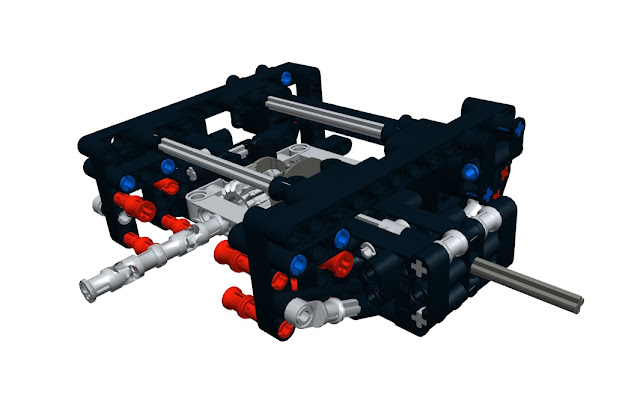
Axles

As the real truck it has live axles. Both rear axles are driven without differential between them.
In each axle between the differential and the wheel the axls has gear ratio 12/20 to reduce necessary torque in the differential and protect bevel gears.

The front axles uses the same steering system as the real Pete, of course the steering wheel turns too, also it turns 4 laps, again as the real Pete
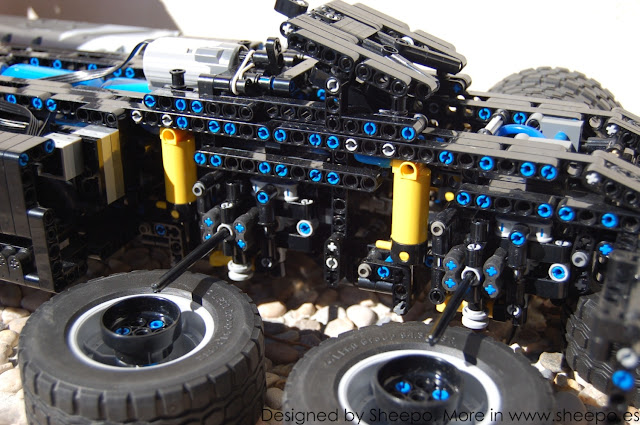

- Suspension

The suspension is fully pneumatic in all axes, and it doesn't use any spring to help.
The front axle has 4 big cylinder and each rear axle 2.


The cylinder are controlled by a valve connected to the same axes. So that the truck can maintain the height to the floor regardless of the weight above it. If the weight increases the suspension is compressed and the valve opens getting more air into the cylinders, then the suspension turns to stretch and returns to its normal height and the valve closes.
If the weight is reduced same thing happens, the valve opens and lets out some air until the pistons down to the normal position.
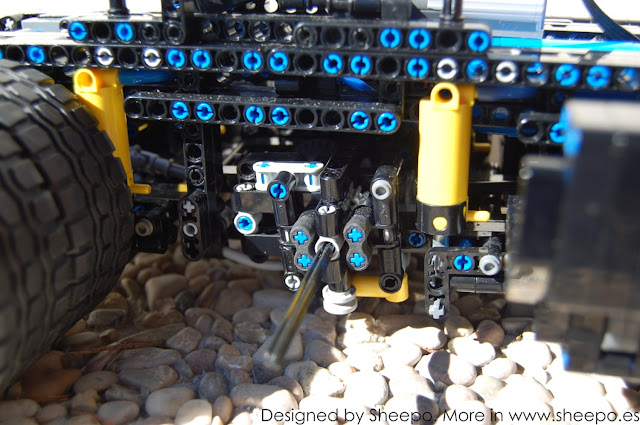
- Brakes

The brakes as the real truck are drum brakes, there are a drum on each side of each axle, all of them controlled by a small pneumatic cylinder.
The control of these pistons are made through two valves, one for the front axle and one for the rear axles.


For normal braking the brakes operate all at the same time, but only while you are keeping push the brakes botton.


But you have also parking brake mode, if you push the brakes botton in the opposite direction only rear brakes works, and they will not disabled if you stop pressing botton. To remove the parking brake you only need use the normal brakes.

- Auxiliar output

Behind the cabin there is an auxiliar pneumatic output(blue connector), where you can connect anything you want. The valve to activate it is located before the rear-right wheel
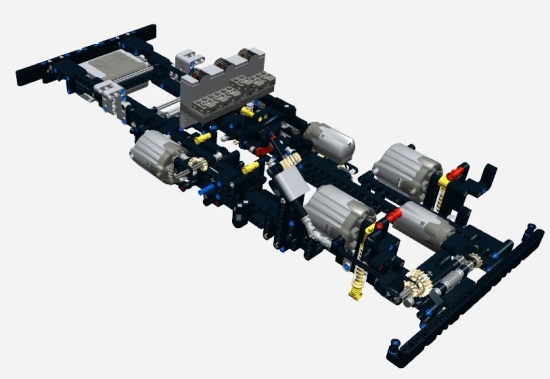
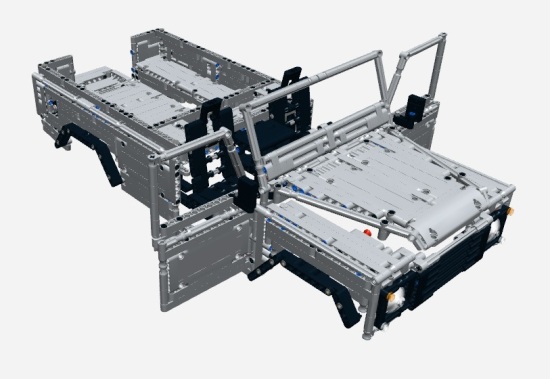
Transmission

The transmission is the biggest mechanism of the truck, and it has an approximate size of 25x7x45 studs.
It uses 4 XL motors for drive.

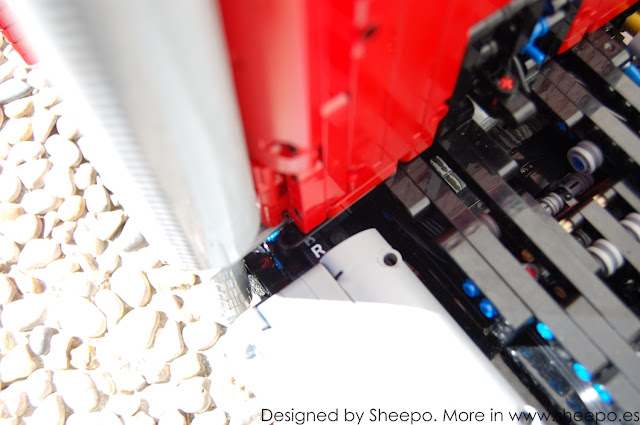
The transmission has 18+2R speeds(this is true, is not a joke...).


The transmission is divided in two parts: the main gearbox with 9+R speeds with automatic clutch(this gearbox is based on the LR Defender), and a transfer case with 2 speed (H and L)

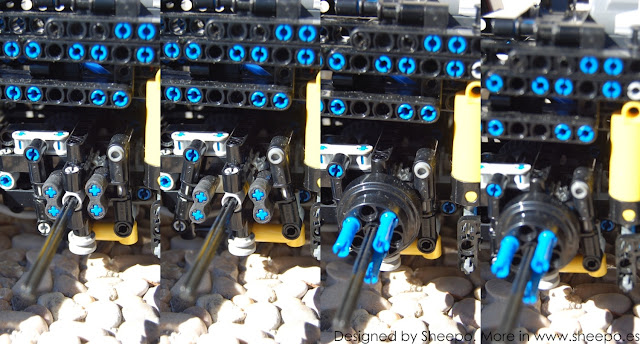
The main gearbox uses a XL motor to shift gears, it has a speed indicator behind the cabin, and speeds ratio are the next:

R-1:0.29
1 - 1:0.36
2 - 1:0.48
3 - 1:0.6
4 - 1:0.8
5 - 1:1
6 - 1:1.33
7 - 1:1.67
8 - 1:2.22
9 - 1:2.78

The transfer case uses a M motor, and the speeds ratio:

Low (L)- 1:0.9
High (H)- 1:1


Joint both gearboxes the result is this:

RL-1:0.261
RH-1:0.29
1L (1) - 1:0.324
1H (2) - 1:0.36
2L (3) - 1:0.432
2H (4) - 1:0.48
3L (5) - 1:0.54
3H (6) - 1:0.6
4L (7) - 1:0.72
4H (8) - 1:0.8
5L (9) - 1:0.9
5H (10) - 1:1
6L (11) - 1:1.2
6H (12) - 1:1.33
7L (13) - 1: 1.5
7H (14) - 1:1.67
8L (15) - 1:2
8H (16) - 1:2.22
9L (17) - 1:2.5
9H (18) - 1:2.78

Auxiliarelectric output

As I said before, the truck has an auxiliar pneumatic output, but also it has an auxiliar electric output too.
There you can connect anything you want, and control it with the remote controller.

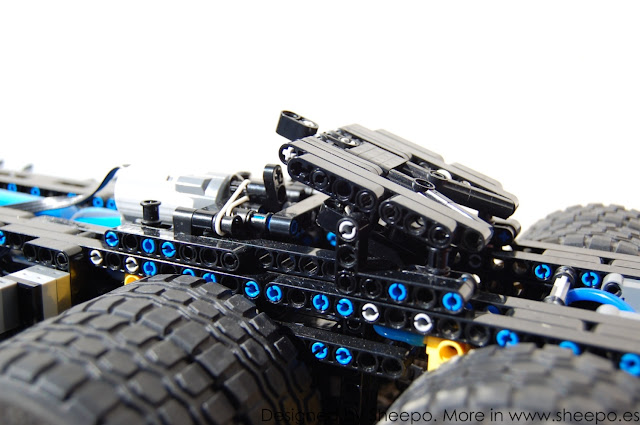
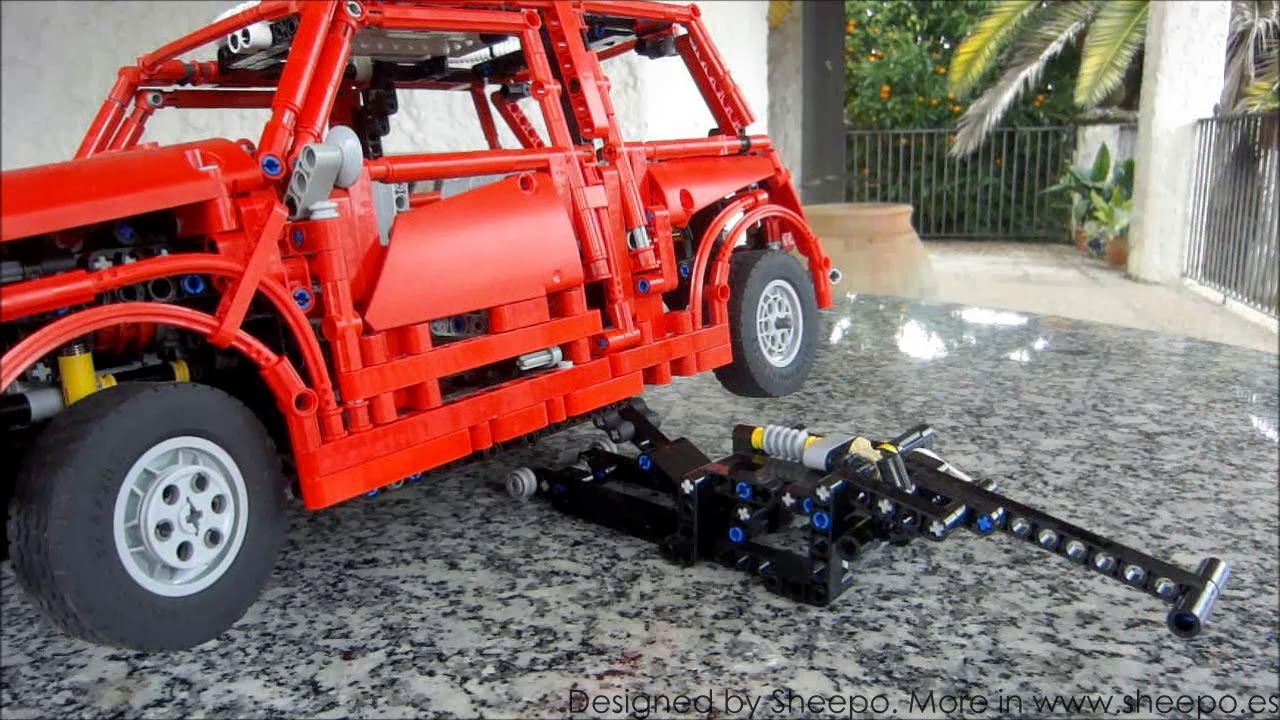
To avoid leaving this connetor without any use I have added a fifth wheel(trailer connector).

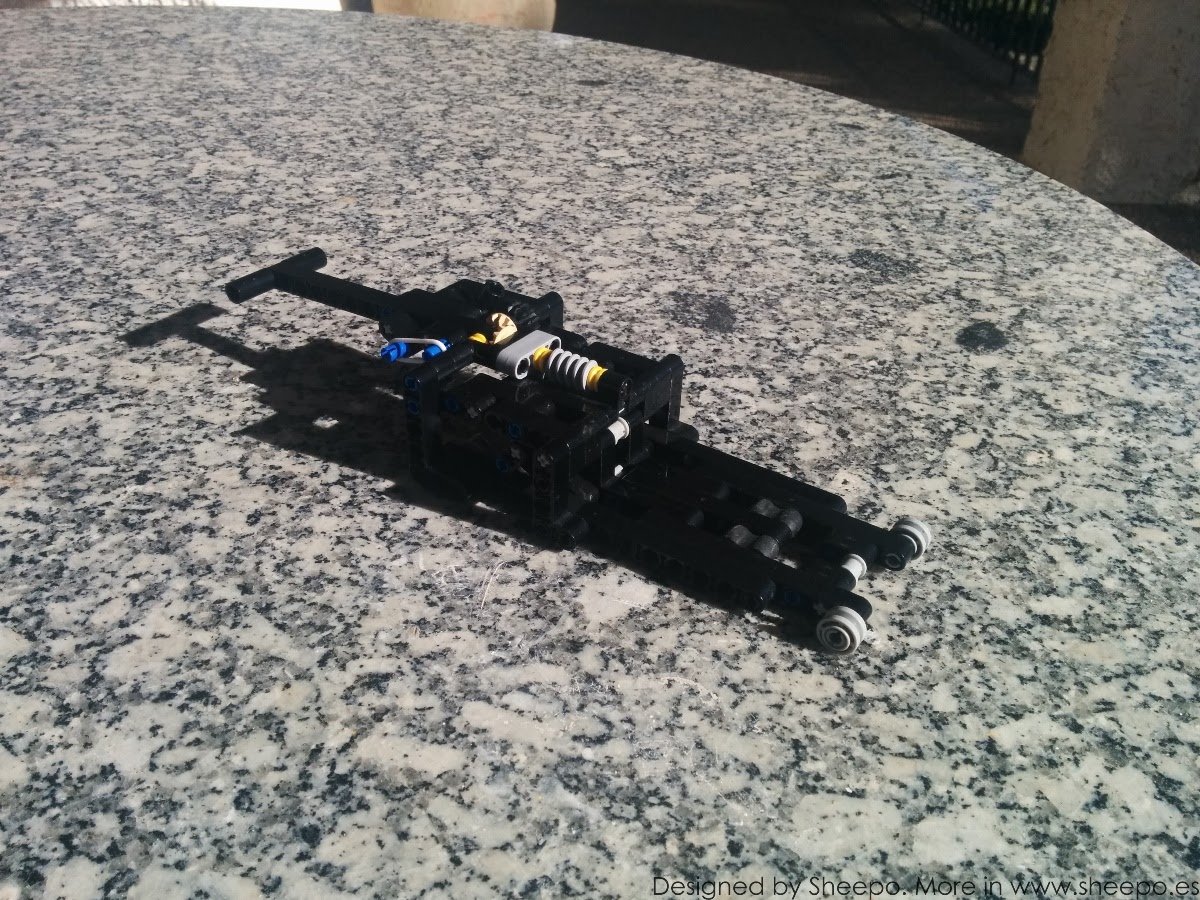
- Fifth wheel

Note: right now I don't have intention to do a complete trailer.

It is very simple and effective. The kingpin diameter is 1 stud.


The fifth wheel is on the chassis, but it is not part of it. You can remove it removing only 4 pins.


Finally as always, you can see a complete video with all features showed:


And see all pictures here:

http://www.brickshelf.com/cgi-bin/gallery.cgi?f=516453


I hope you like it!!

Instructions comming soon...

$
0
0
A few months ago I did a survey on this website to know if people want instructions for my MOCs, and the price that they think will be fine to pay for it to compensate the hard work necessary to make it.

The results was very possitive, and I decided make it as soon as I win some free time... and this moment arrived some days ago....

The first instructions will be for the Land-Rover Defender, I started to do the digital files, and now they half done, after that only left prepare the final PDF.


Before you rub your hands... the instructions will NOT BE FREE.

Of course I will publish the complete part list as soon as I get it, and then you can decide if you want to buy the instructions or not.

If you want I send you an email when the instructions are available, send an email wroting it to:

info @ sheepo.es

Of course, I will not share those e-mails with other people

UPDATE: 1-7-2013

I finished the digital files some weeks ago, my helper has now the files, he needs some time to make the PDFs.

The total parts count is higher than I thought... it has around 3200 parts.

- Complete Chassis


- Drive train

-Front axle


- Rear axle


- Bodywork


Remote controllers with instructions

$
0
0
Many people have asked me about the remote controller I use to control my supercars.

My usual remote controller is a triple controller, it is made with 3 normal PF remote controllers joint with some added elements to make it easier to use.


With this controller I can control all functions in my MOCs at the same time, it is much more comfortable than use a "two lever" controller.

The main added elements are a steering wheel in the right site, a trigger between first and second controller and a front big lever to change speeds.


Its construction is very simple, but to help people to build it more easily I have prepared a step by step instructions.

Also I know that not all MOCs needs to use 3 controller, so I have made 3 more versions to use 1, 2 or 4 controllers.


You can download free instructions step by step for all of them in PDF here:

Download ()

I hope this will be very usefull for you!!

Land-Rover Defender 110 instructions are now available!

$
0
0
After a long wait, finally the Land-rover Defender instructions are now available!!!

Finally the Defender has 3438(+3 extra) parts including controller(!!)

The instructions are made in PDF format, and they have 448 pages(96 MB).


You can download the complete part list in .bsx format, and the software to view it here: DOWNLOAD ()

With that Brickstore software you can add directly the complete part list to your bricklink wanted list.

Also you can check the complete part list in rebricable.com

The instructions cost is only20€


Please, before purchase the instructions read this!

- I only acept payment by paypal, and only in euros(€).

- If you don't receive your instructions after 24 hours of the payment, please check your spam folder, and if the email is not there send me an email to: info @ sheepo.es

- The instructions will be send(actually a link to download it) to the payment email adress. If you want, I'll send you the instructions to a different email adress, please leave a comment in the paypal payment.

- For MAC users: mac can't open zip files with password, to open the instructions you will need an extra software (you will can find a lot of free software in internet to do it).

- Build this car is very hard, if you have never built a Lego Technic set, I recommend you to do it first. Doing that is not necessary but it will help you later when you built the Land-Rover

- If you buy it, you can't resale it or share with anybody

- I forgot add and advice in the page 172 about how to put correctly the parts. here you can see how to put it: the Axle Connector Smooth has two rounded sides and two flat sides. It is very important that the internal pins of the Driving Ring (6539) coincide with the flat faces of the axle connector


- The instructions has been tested by a Lego Technic expert builders, if you can't built the car and you think the instructions are wrong, check your built twice before ask me.

Finally to buy it click here:


Frequently Asked Questions

- What is the best site to buy the parts? -> www.bricklink.com

- What happens if I lose my instructions copy(hard drive failure or virus)? -> I have a data base with all costumers of my instructions, if you lose it you can email me and will send it to you again free.

- There is any Lego Technic set which I can buy to reduce the parts cost? -> No, but you can buy the Technic set 8110 (Unimog). With it you can't reduce the parts cost(of course you still need many spare parts), but after building the car, you stay a few hundred parts for you.

Sheepo's Garage second aniversary!!

$
0
0
This week is the second aniversary of this website!!!


Thanks to everyone to help me to keep this site working!!


This two last years have been very important for me as Lego builder.
My MOCs have been very popular with tons of visits in this website and for its youtube videos (specially the Porsche and the Defender), also some of them have appear in a magazines around the world, I am selling instructions, even I am building some Lego MOCs under request to some companys

This website receive around 1800 visits each day(using blogger data), 55,250 visits in the last 30 days, and nearly 1 million since I created this site 2 years ago. This is a fantastic result for me, and I can't wish better results ;)

I know I am not the most prolific technic builder, but I prefer build only 2 or 3 big MOCs each year and keep my MOCs with high complex level, because I think that this is my hallmark.

At the begining if this year I started to sell my first instructions, the sales of it are very good, and I have the intention to make instructions for some of my others big MOCs(Veyron, Porsche and Mini), but to make it I will need many time.

This is my route map for the next months (and years...):

- Continues launching one big MOC each 5-6 months. In this moment I am working in completly new car.
I published here a entry about failed supercar some weeks ago, finally I didn't disassemble it, so maybe I will can continue with it.

- Upgrade the Porsche 911 and the Veyron with new gearboxes with better reliability and made instructions for they and for the Mini too.

- Add more elements to the MPS, I know it looks as I forget it some months ago, but this is not true. Comming soon I will publish an important entry about it.

- Publish a completly new Modular System, I have developed it along the last months and I am very hopeful about it. I think it will change your point of view about the complex supercars...

- Also I will publish some little technical ideas and usefull mechanims.

I hope I will can follow my own route map ;)

Thanks again to everyone for your support and I hope you will like my next entries!!


New MPS elements

$
0
0
About a year ago I introduced the Modular Platform System(MPS) to help people to built its own supercars with advanced suspensions system easily.

You can find all published information about it here: MPS


Now, 13 months after the last update of it, I want to add some new elements to the MPS(axles and frames)

In this moment is when I need your opinion and ideas for new MPS elements.

Obviously I will not made all elements to tell me, but I will study all of them, and I will built all of it which could be interesting for me.

Please leave a comment in this post with your ideas ;)

I will not rebuild the old axles with little modfications, like wider or narrower... this is your work as user of it ;)
Try with new types of axles, or with more advanced features, for example: front live axle, "buggy" type rear axle or double beam chassis

I am waiting for your ideas!

Interesting ideas:

Front axles

- Multi-link
- F1 type (EB)

Chassis

- Cage type (EB)

Rear Axles

- Multi-link
- F1 (EB)
- Leaf spring solid axle -> DONE
- Torsion-beam (semi-independent)

MPS. Rear axle IV: Live axle with leaf spring

$
0
0
Following the idea by legomuppet9.

With drive (code F.CD)

- R.CD.2

Standard: No, it need a big hole in the chassis for the drive shaft.
Max shock adsorvers allowed: None, supported by leaf spring under the axle
Advanced suspension geometry (Camber angle): No


You can read more about the Modular Platform System here: MPS

Also you can download all axles and chassis in only one link: Download ( )

MPS. Rear axle V: Torsion-beam

$
0
0
Following idea by Zachary Cross

Without drive (code: R.D)

- R.D.1


Standard: Yes
Max shock adsorvers allowed: 1, it can use hard spings, but works better with soft springs.

Advanced suspension geometry (Camber angle): No


You can read more about the Modular Platform System here: MPS

Also you can download all axles and chassis in only one link: Download ( )

MPS. Rear axle VI: Multi-link (4 links)

$
0
0
Following the idea of an anonymous reader

With drive (code: R.ED)

- R.ED.1.1 - Push-rod


Standard: Yes
Max shock adsorvers allowed: 1
Advanced suspension geometry (Camber angle): Yes


- R.ED.1.2 - Mid-size space (7 studs wide)


Standard: Yes
Max shock adsorvers allowed: 2
Advanced suspension geometry (Camber angle): Yes


- R.ED.1.3 - Large space (9 studs wide)


Standard: Yes
Max shock adsorvers allowed: 2
Advanced suspension geometry (Camber angle): Yes

- R.ED.1.4 - XLarge space (11 studs wide)


Standard: Yes
Max shock adsorvers allowed: 1
Advanced suspension geometry (Camber angle): Yes


You can read more about the Modular Platform System here: MPS

Also you can download all axles and chassis in only one link: Download ( )

Caterham Seven

$
0
0
I am here again with a all-new car. It was showed at first time in the past MADbrick event.(May 1-5th)

The Caterhan Seven (also called Caterham 7) is the present version of the original Lotus Seven (or Lotus 7) designed by Colin Champan in 1957.


This car is very famous because it is extremly ligth, and it has outstanding dinamic specs, which make this car perfect for its use in competition and track days.

The original:


This creation is made in scale 1:7. Thus remains in 29 studs wide, 56 of length and 20 fo high(23x45x16cm).
The weigth is 2.2kgs.
It has around 2500 parts.


As all my MOCs, this includes some remote controlled functions:
- Steering (PF M motor)
- Drive (PF 2XL motors)
- Sequential 5+R speeds gearbox (PF Servo motor)
- Disc brakes (PF M motor)


This car arrives with a 5+R speeds version of the all-new 3th generation of my sequential gearboxes. The new generation is even more compact and reliable. Of course it has auto.clutch


It has a gear indicator in the cabin.


Just behind the seats, over the rear axle are the battery and the drive motors (2XL)


The Seven design is based in a tubular unibody frame with double wishbone front independent suspension and DeDion rear live axle.

The front axle is double wishbone type with caster angle, camber angle and ackerman steering.


The original Lotus 7 had a typical rear live axle, and the newest and powerfull version has independent suspension , but the most common rear axle is the DeDion axle. Like the real one, this creation has rear 3-links DeDion axle(you can see it in more detail in the video)

The "most wanted" picture.


This creationa also has working brakes in all wheels(the same brakes used in my Land-Rover)


Like the real Seven, this creation mantains the unibody frame. Also to reduce the weigth, the frame and the bodywork are the same thing. The yellow liftarms in both sides of the car are the bodywork, but at the same time are the frame of the car.

You can remove in 2 minutes the bonnet, the drive train and the brakes lever, and then you will get this:


This picture shows how the structure is made


As always a little video:


I hope you like it!!

Newsletter subscription added!

$
0
0
Many people ask me almost every day if I can send they an email when I publish new instructions.

To make this job easier for me and for you, I have added a new newsletter by email subscription.
You can find it in the right column in this website         -->>   -->>   -->>   -->>


Now you only need write your email adress in the box, and I will send you an email each time I publish a new instructions (free or not free). Obviously I will not share your email with anybody.

If at any moment you don't want to receive more emails, please don't send it to your spam folder, you only need to send me an email telling that and I will delete you in the list.

Making of: Mini Cooper Mark I

$
0
0
I spent more than one year to develop and build the Porsche 911, along 2010 and 2011. Finally I finish it in May 2011.

After dedicate all that time to only one car, I wanted to build something smaller and simpler, but at the same time I wanted to keep a part of the complexity showed in the Porsche 911.


I started the build in August 2011.


The problem with this "making of" is that I don't have pictures of the car until September... ;(

9/3/2011 - I started the car with the gearbox (here you can see more info). It was the first of my cars with a 2nd Gen. gearbox.


9/12/2011 - Underside of the frame.


9/15/2011 - The frame is almost finished. If you look closely the steering wheel is in the left side...


10/10/2011 - Now the bodywork, the the top and doors...


10/12/2011 - The front and bonnet. The steering wheel continues in the left side...


10/23/2011 - The rear and the hood


10/25/2011 - Car finished!! After finish the car, I decided change the side of the steering wheel.


As always, more picturea and info here.

Lego Fan Weekend 2013 in Skærbæk

$
0
0
This year again, I will asist again to the Lego Fan Weekend event in Skærbæk at September 28th and 29th


I will show there some of my MOCs as:

Land-Rover Defender 110
Mini Cooper Mark I
- Caterham Seven
- Truck Trial 4x4 Y2013 (not showed in this website)

And like the past year, I will show there a completly new MOC!! It is new car this time!!


Even in the summer are enougth good for me, maybe I can carry a second new MOC... but it is still not sure.

Ford Mustang Shelby GT500 '14

$
0
0
This is the secret car that I showed in the Lego Fan Weekend two weks ago.

The Mustang is one of the most famous cars in the world since 1964 with its first generation.
One year after the Mustang was released, Ford wanted a enhanced version of its car for run at the same level of its rivals in the US races. To design this car Ford hired the driver and car designer Carroll Shelby (1923-2012).


The first Mustang modified by Shelby was the GT350, released in 1965, and the next year(1966) Ford and Shelby showed the legendary Shelby GT500. The collaboration between Shelby and Ford continues today.
And this is my interpretation of the current version of that historic collaboration.

The real one.


This creation is made in scale 1:8. The total size is: 75 studs of length, 29 wide and 21 of high (60x23x17 cm)

The weight is 3.1 kgs, with around 3500 parts and 5 motors.


It includes some remote controlled functions:
- Steering (M motor)
- Drive (2 L motors)
- Sequential gearbox (PF Servo motor)
- Disc brakes (M motor)


The sequential gearbox is an improved version of my previous Caterham ones (3rd Gen V2), with 5+R and auto-clutch.

The speeds ratio:

R - 2.08:1
1 -  1.67:1
2 -  1.25:1
3 -  1:1
4 -  1:1.33
5 -  1:1.67

The max speed in 5th speed is 3 kph (~2 mph)
It has a gear indicator in the interior, between the front seats.


V8 fake engine under the bonnet.


A complete bodywork with openable doors, bonnet and rear truck hood.
The bonnet can be opened from the interior using a little lever just front of the right seat.
Also the doors have lock, you need turn the door handle to open it.


It has 4 full size seats and folding front seats.


For make more easy the gearbox tests the car in has a rear support to keep the rear axle lifted


The suspension is based in the real one: front McPherson axle and a rear 4-links live axle.

The front axle also has advenced geometry: Camber angle(2º), caster angle(3.5º) and kingpin angle(7º)


The steering has ackerman geometry and working steering wheel.

The car also has working disc brakes in all wheels, they are very powerfull and includes functional brake pedal.


Now the "most wanted" picture for technic fans:


Like the real one, this creation has unibody frame. The roof is part of the frame too, it improve a lot the torsional stiffness.


You can disassemble the whole car in less than 3 minutes. But you will need a little bit more time to reassemble it again...


COMPLETE INSTRUCTIONS WILL BE AVAILABLE COMING SOON!!

Finally as always a little video:


I hope you like it!!


Cable-stayed bridge (TrenBrick 2013)

$
0
0
This is my thrid bridge, and it is the biggest MOC I have ever built.

This MOC was presented in TrenBrick event in Madrid, on October 2013. Organized by ALE! (Lego Spanish Association) in the Railroad Museum of Madrid


It has a total length of 524 studs, thats it 419 cm (165 inches)

It is divided in two parts with a 256 studs of span each one.


It has more tham 4000 parts, with 174 11x5x1 Technic panels

 
It has 206cm of high (82 inches).

The tower can support vertically more than 40Kgs.


Finally a video of the bridge, trains and of the whole event.


Enjoy it!!

Merry Christmas and a Happy 2014!!

$
0
0
To all my readers and followers:

Merry Christmas and a Happy 2014!!


Good intentions for this new year (I will try to comply them):

- Show two more big MOCs, like the past 3 years, one in May or June, and another one in September or October.

- Also I want to show at least one new small MOC every month. And even sometimes they will can have complete LDD files.

- Launch some more instructions for my big MOCs.

- Write some tutorials about how build big technic cars and other themes.


I hope you enjoy my updates along this new year!!

Ford Mustang Shelby GT500 INSTRUCTIONS!!

$
0
0
Finally the instructions for my Ford Mustang Shelby GT500 are here!!

For more info about this creation click here

This time the instructions come in two versions: RC and MANUAL
The original version showed in this website is the RC.

The instructions are made in PDF format, and they look very similar to the LEGO Official ones.


RC Version

The whole car, including the controller has 4006 parts!!!(more than I ever though...)

Ths instructions have 611 pages, and 152MB

You can download the complete part list HERE ()
In the file you can find:
 - The part list in .bsx format, to be open with brickstore sofware
 - Brickstore software(compatible with Windows and MAC)
 - The part list in XML formal(.TXT), compatible with bricklink.com
 - The part list in image format(3 pages)

Also you can see the part list in rebrickable.com

The price is 20€


MANUAL Version

The car has 3564 parts.

The instructions have 543 pages and 132MB

You can download the complete part list HERE ()
In the file you can find:
 - The part list in .bsx format, to be open with brickstore sofware
 - Brickstore software(compatible with Windows and MAC)
 - The part list in XML formal(.TXT), compatible with bricklink.com
 - The part list in image format(3 pages)

Also you can see the part list in rebrickable.com

IMPORTANT ABOUT THIS VERSION!!!

The MANUAL version DOESN'T have a sequential gearbox, it has just a manual 5+R speeds gearbox. This is because the sequential gearbox can not be operated easily without a motor.

But this version has handbrake (the RC doesn't)

The price is 15€

Please, before purchase the instructions read this!

- I only acept payment by paypal, and only in euros(€).

- If you don't receive your instructions after 24 hours of the payment, please check your spam folder, and if the email is not there send me an email to: info @ sheepo.es

- The instructions will be send(actually a link to download it) to the payment email adress. If you want, I'll send you the instructions to a different email adress, please leave a comment in the paypal payment.

- For MAC users: mac can't open zip files with password, to open the instructions you will need an extra software (you will can find a lot of free software in internet to do it).

- Build this car is very hard, if you have never built a Lego Technic set, I recommend you to do it first. Doing that is not necessary but it will help you later when you built the Mustang

- If you buy it, you can't resale it or share with anybody
- The instructions has been tested by a Lego Technic expert builders, if you can't built the car and you think the instructions are wrong, please check your built twice before ask me.

Also you must think that the pieces are not perfect, so the gearbox are not 100% reliable, it should make good around the 90% of the speed changes


Finally to buy it click here


RC Instructions (20€)


MANUAL Instructions (15€)


Frequently Asked Questions

- What is the best site to buy the parts? -> www.bricklink.com

- What happens if I lose my instructions copy(hard drive failure or virus)? -> I have a data base with all costumers of my instructions, if you lose it you can email me and will send it to you again free.

- There is any Lego Technic set which I can buy to reduce the parts cost? -> No, The only set with some parts in common with this MOC is the set 42000

Mechanic Garage Jack

$
0
0
Almost over the horn, here is the first MOC of this 2014.

This a little and simple MOC designed in about 5 hours for the Hispalug Expo Event.


For the alternative movement it uses a freewheel mechanism with a reverser(for up and down)


It can lift more than 1kg. Enough to lift my Mini.


A little video.


Finally you can download complete building instructions and LDD fileDOWNLOAD ()

AXR 400 Crossbone

$
0
0
This is a little MOC designed in a few hours to get my mind far of my new car for a while...

It is built in scale 1/10. And the weight is only 450 grams.


This MOC is based in the small French buggy AXR 400.


 The final size is 30x18x15 studs.


It uses a PF M motor for steering, with auto-center.


For drive it has a PF L motor, it it can use a M if you want.

You can change easily the gear ratio between: 1:3(8kph), 1:1.67(4.5kph) or 1:1(2.7kph).


The suspension is independent in the front axle, and a pendular axle in the back.


As always a little video:


Finally you can download the complete instructions here: DOWNLOAD ()


Viewing all 73 articles
Browse latest View live